Reinforcement Learning with Sim2Real on the Turtlebot3 platform (experiments)

While creating the concept of a new University module that has the students do a project with the Turtlebot3 robots and RL, a few ideas emerged. While evaluating different robot simulation tools for Reinforcement Learning, one in particular caught my eye: the Godot plugin “godot_rl_agents” by edbeeching. This was the result of a paper creating a bridge from Godot to RL libraries like StableBaselines3.

After trying the plugin it was clear that good result can be achieved quickly, there emerged the idea that students might be more encouraged learning the whole software stack when it involves a popular game engine instead of a “random” simulator with its own proprietary structure and configuration. So now it had to be proven that Sim2Real works with this Situation.

A friend modelled a “digital twin” of a turtlebot3, as the existing open source models usually used were very unoptimized and would hinder performance of actual training. It was purposefully minimal, but with accents to make it recognizable.

At first there was an example with just driving to a target point based on the map. No sensors needed.
Simulation:

This was the first result:

The robot visible moves pretty badly in this clip. The reason which was later found: When the sent velocity commands would result in a jerky movement, the controller kind of rejects it and sometimes only does a part of the movement. Or sometimes no movement at all. To counteract this, the input has to be smoothed out beforehand to resist rejection from the controller.

Here is the next experiment with the lerp in mind:

This was the result:

The video shows that the robots performance can definitely be improved regarding stability and sensor calculations. Another big problem is also very visible here in that the small metal caster on the back of the turtlebot is very incompatible with the labs’ carpet flooring. This will be mitigated in the future with wooden plates that will make up the box’s floor.
Master Thesis: Dog Training

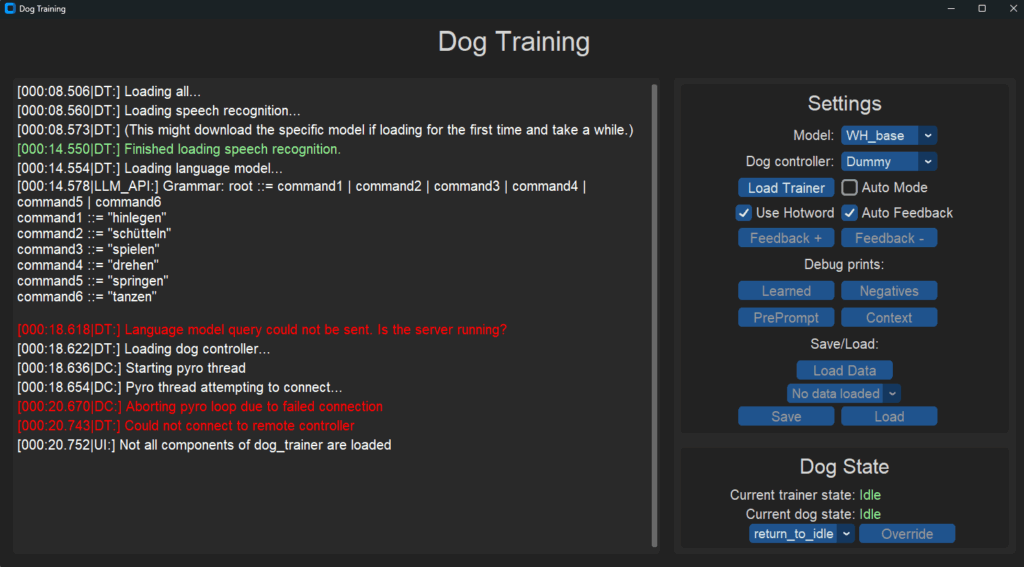
My master thesis topic was “Verbal training of a robot dog“. In this thesis I have created a program stack that tries to simulate real dog training. There are a few pre programmed actions the dog can perform, and it can either “anonymize” the actions or have a few preloaded commands for them. The usual training was done without any previous knowledge and from scratch.

The robot dog used was the Unitree Go1 with various python libraries. The implementation can be found here on the GitHub repo: https://github.com/MisterIXI/verbal-dog-training

A training step goes likes this:
– (optional: Hotword recognition “Hey Techie!” to await actual speaking intent)
– Speech recognition with “Whisper” (Open-source Speech-to-text from OpenAI)
– Check if command has confirmed matches
– Check if command has a small Levenshtein distance to a confirmed command (like “sit” and “sat”)
– Query the local LLM which command could be used
– If the LLM fails or picks a confirmed negative, a random action is rolled from the remaining actions
– The dog executes the picked action
– The dog awaits Feedback: Listens to “Yes” & “Correct” for positive, and “No” & “Wrong” for the negative feedback
– The picked Command + Action Combo is memorized
– The Loop repeats

The end result was a soft success. The training itself had to rely on quite a bit of randomness, since a very weak and small LLM was used which could’ve accelerated the process immensely. The same goes for the speech recognition, which failed a lot of times and resulted in bogus text recognized. With the stronger models it worked way better, but the calculation time was reduced from practically real time to up to 30 seconds, which was unacceptable in this case.

Reinforcement learning agent with visual inputs

As the module “individual profiling” in university, I created reinforcement learning agent working only on visual inputs, which could generally control anything on the computer. It was mainly built to play a certain video game, but can (in theory) generalize to do anything with visual input. It just needs an interface class to be written which converts the outputs to the desired thing to do.

For more information, visit the GitHub repo of the project (there is also in-depth documentation of the creation of the project).

Here are the two main examples used to show the best progress in two different games:

1. Driving nightmare (a game jam game created by a team of three people including me)

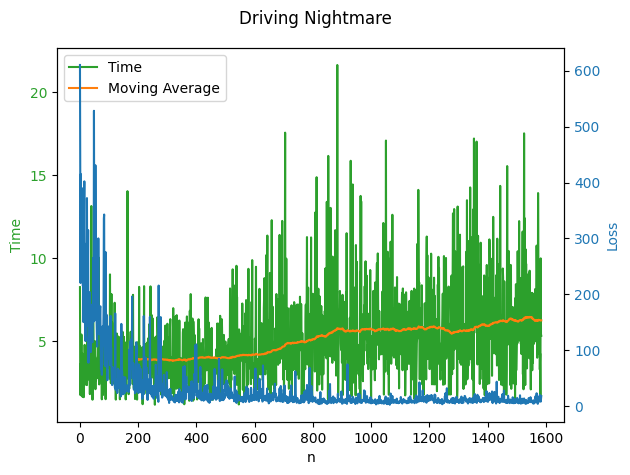
    This diagram shows the learning progress over 1600 iterations. The green line representing how long each run was (the higher the better) with the yellow line showing the average. The “loss” in blue being how far off the model thinks it is from the expected result.

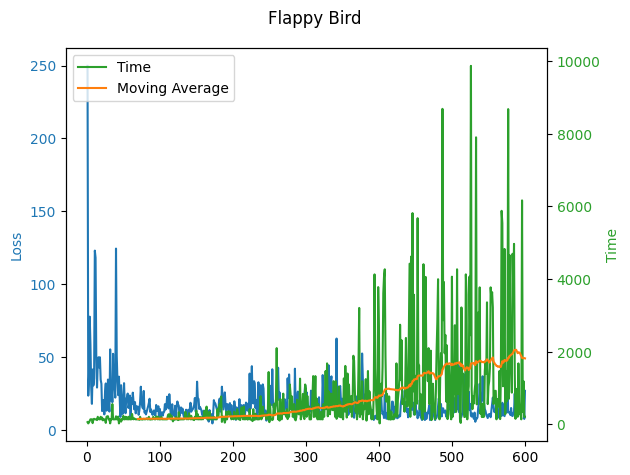
    2. A simple Flappy bird like program built specifically for the AI. The flappy bird game can be advanced by code in specific steps, so it can wait for a slower working network without dropping any inputs.

    (Math:) Projective space visualizer

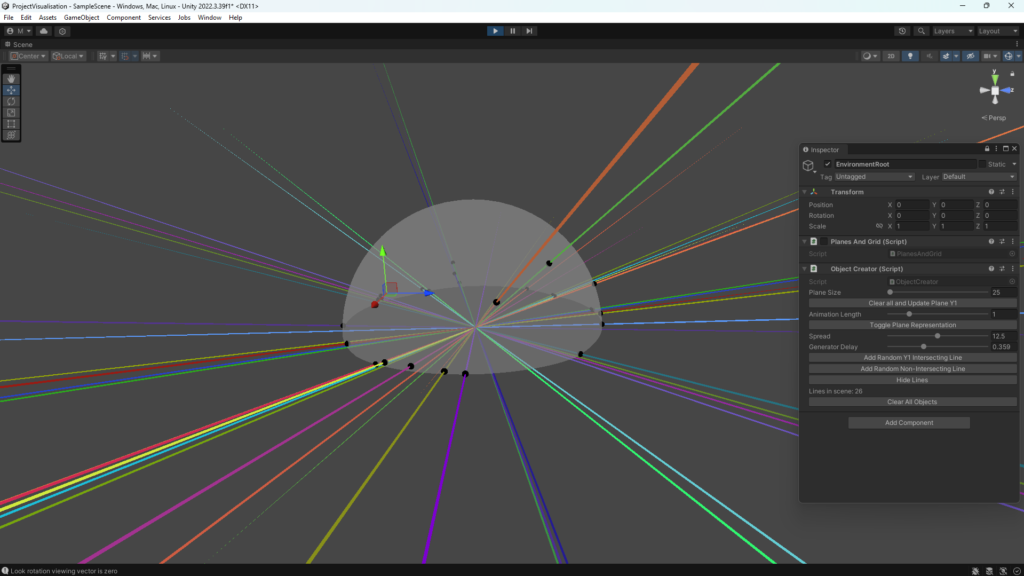
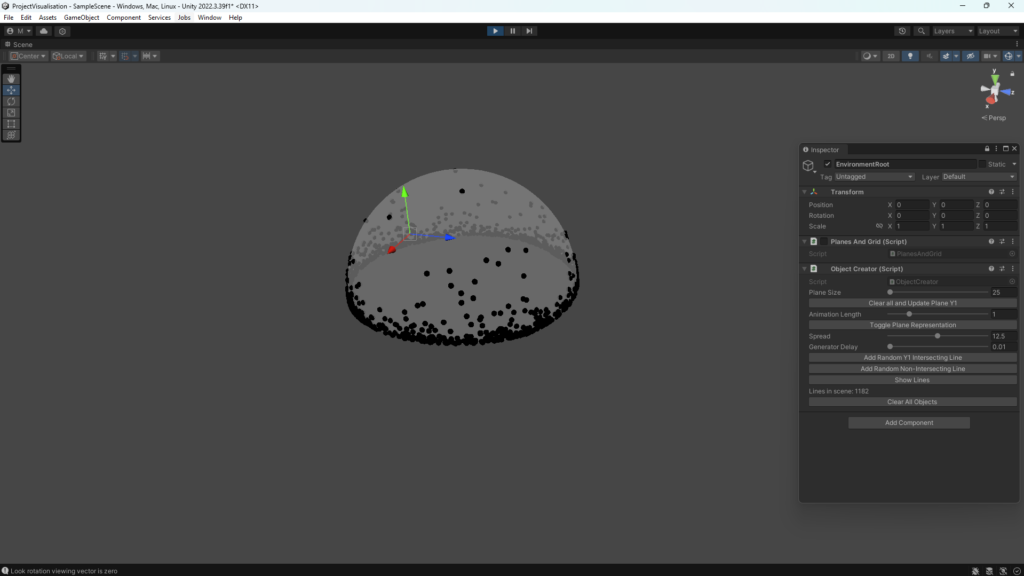
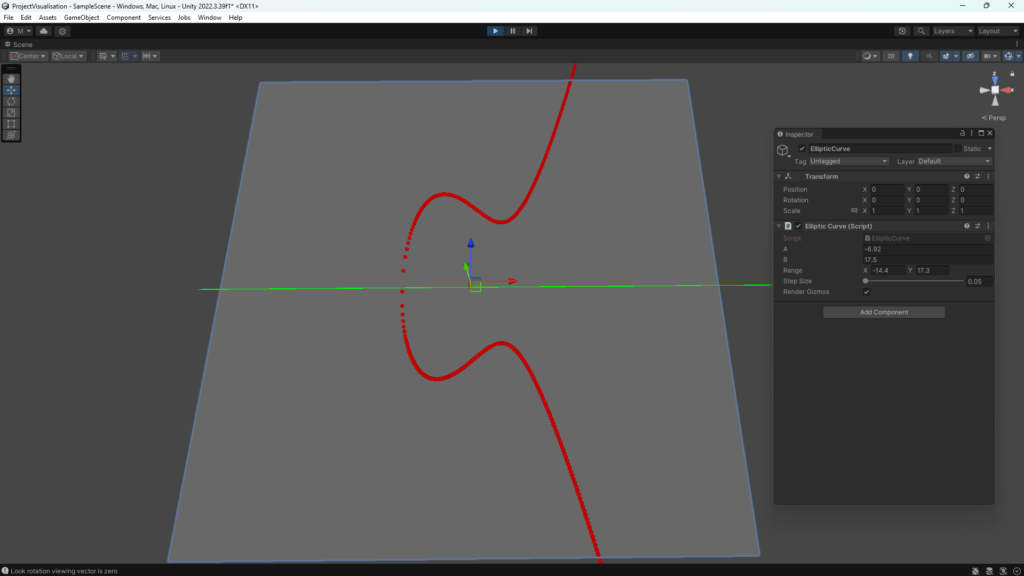
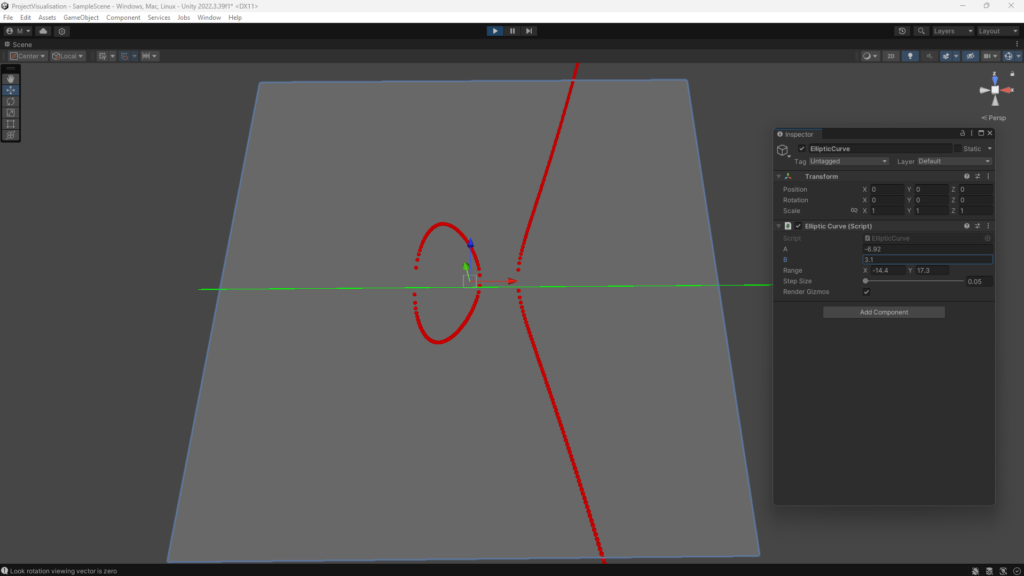
    In my university module “Higher Mathematics” we learned about projective space and the different representation with the hemisphere. (Or as we lovingly called it: “salad bowl”) This was part of the basics to understand Elliptic-curve cryptography.

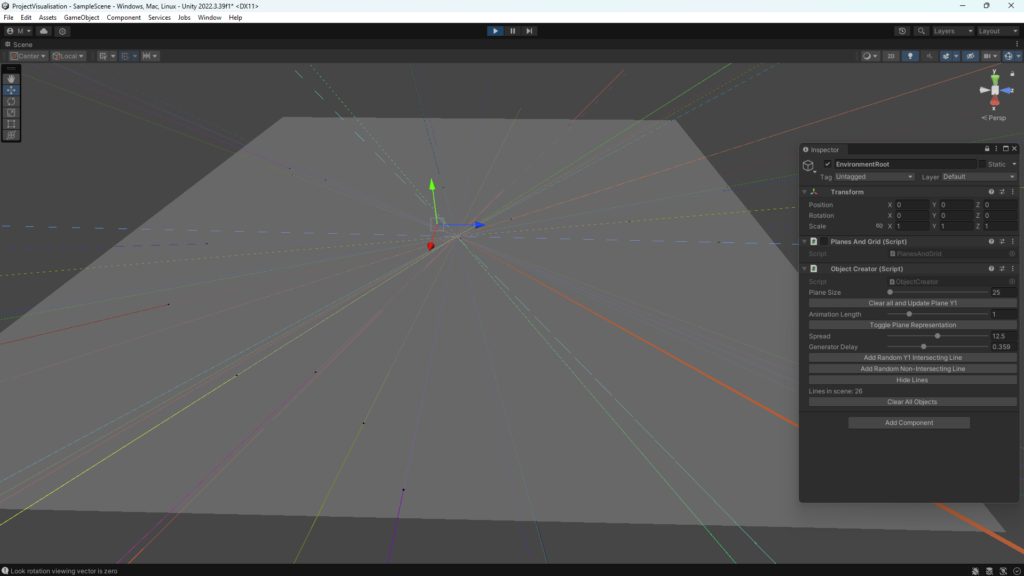
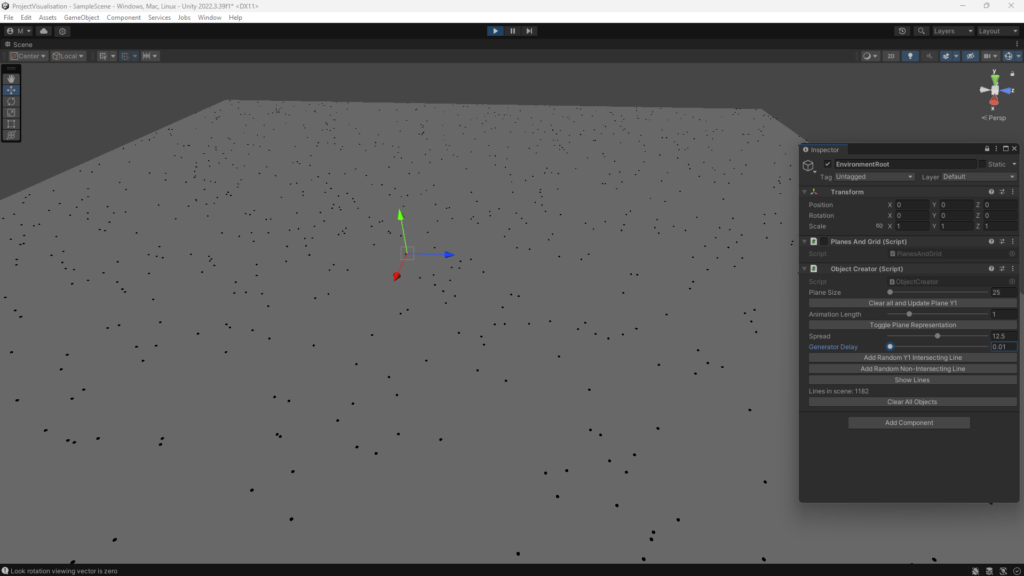
    Since I had a hard time wrapping my head around the secondary representation of projective space, I decided to create a visualizer in the game engine I was familiar with at the time: Unity3d. I built a very crude module that can creates a 2D plane with a translucent mesh which can morph between the two representations. And I also added the intersecting lines together with the points to visualize where the points are at all times. This helped me understand the topic more deeply and didn’t take too much time to make.

    Since it wasn’t planned to be a finished project, it is not really polished, but you can still find the working unity project on the GitHub repository: https://github.com/MisterIXI/projective-space-visualization

    Bachelor Thesis: Non Destructive Reverse Engineering of PCBs

    Full title of the thesis: Non Destructive Reverse Engineering of Printed Circuit Boards using
    Micro Computed Tomography and Computer Vision

    This post only aims to illustrate the main contents of the bachelor thesis, for the full overview, the original paper is best read in it’s full form.

    Here is the abstract of the thesis:
    Reverse engineering (RE) of printed circuit boards (PCBs) is used for a variety of purposes, such as in computer forensics and quality assurance. Usually RE is very labor-intensive or destructive, since it pertains either manually measuring all visible contacts, including desoldering the components for the covered pads and mapping them out individually, or the process is done by milling away layer by layer to see inside the object and uncover the traces. This thesis aims to automate the process as much as possible while being non-destructive. To achieve this, micro computed tomography (µ-CT) will be used to scan the PCB while information will be extracted with the help of computer vision.


    The thesis researches the possibilities of using x-ray to reverse engineer PCBs. This makes it possible to understand PCBs without the need of damaging them using different methods.

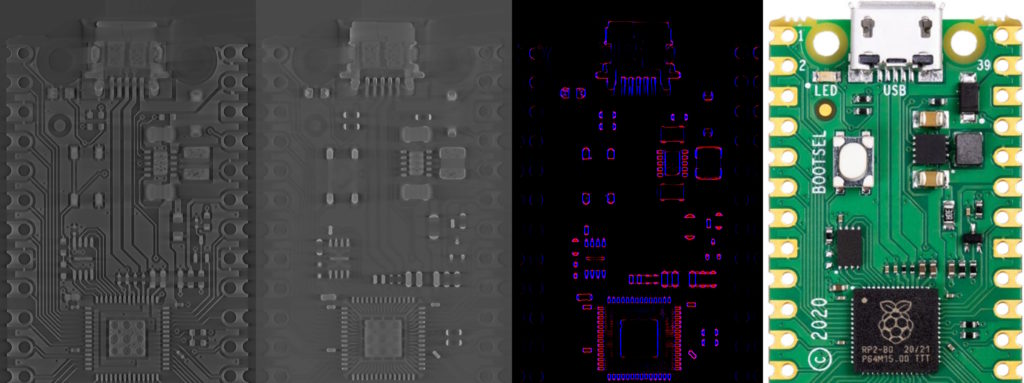
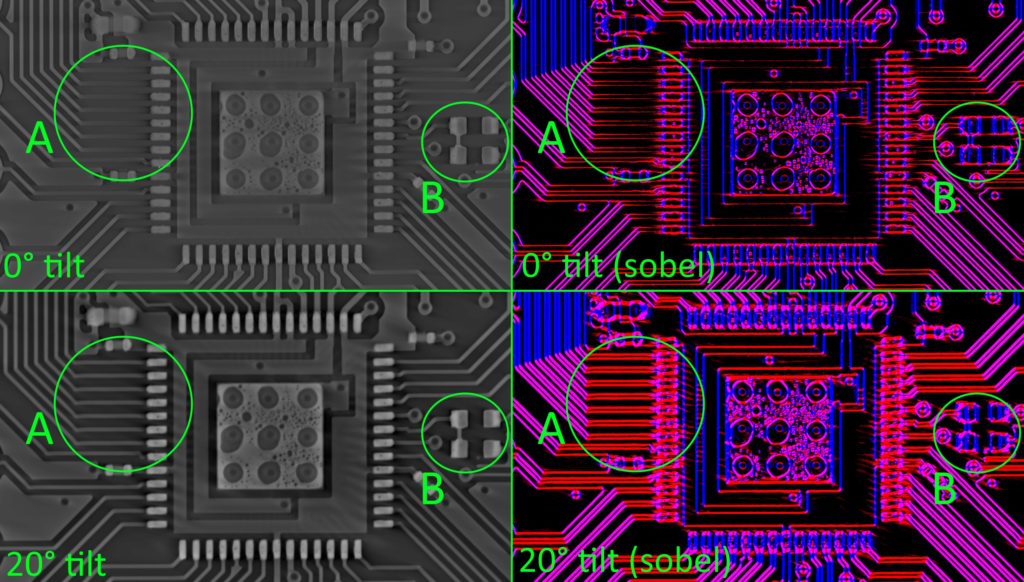
    The program was not finished at the end of the thesis, since the reconstruction part was still missing, but the whole procedure was shown to work in theory. Here are a few pictures taken from the thesis to visualize the problems:

    Left to right: CT scan, pre-processed CT scan, edge detection visualized, original picture

    This is a comparison of the fix by tilting the PCBs when scanning in a certain way:

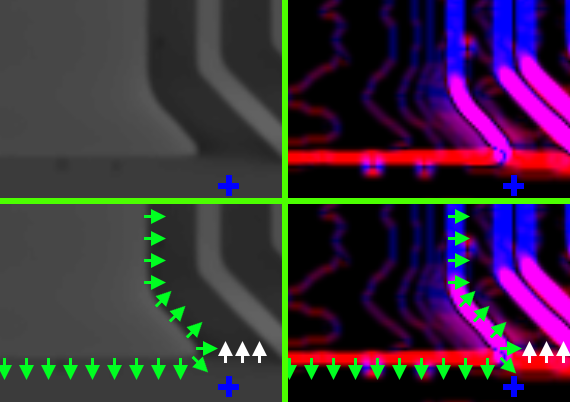
    This picture shows the edge detection up close and explains the coloured lines:

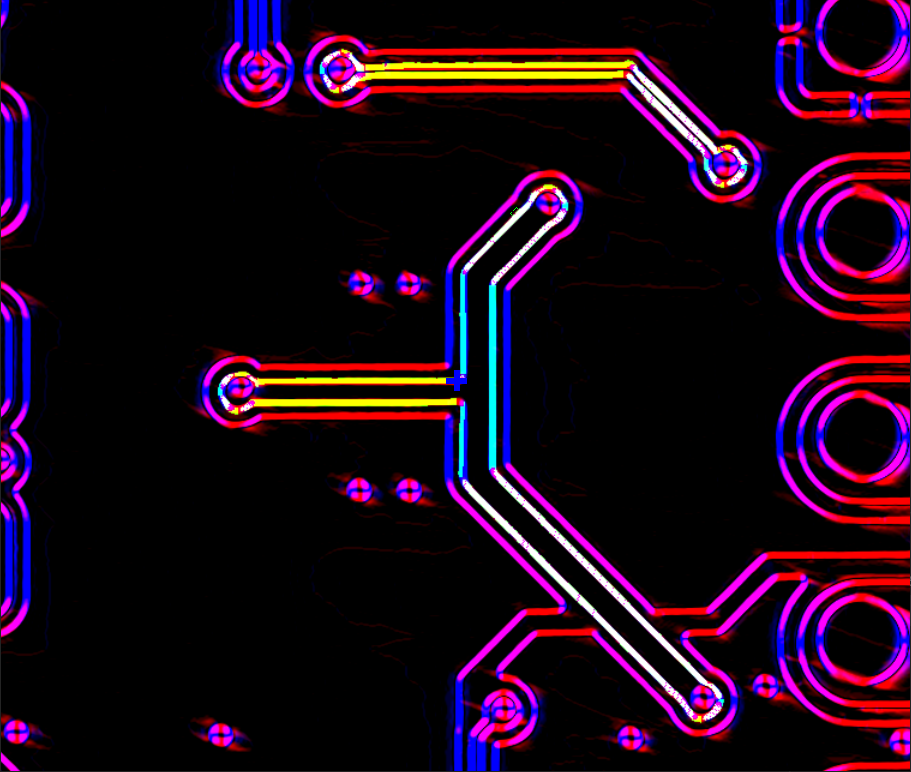
    The picture below shows the algorithm recognizing two traces on the PCB

    High performance and high volume processing and rendering of low-poly 3D ants in Unity3D

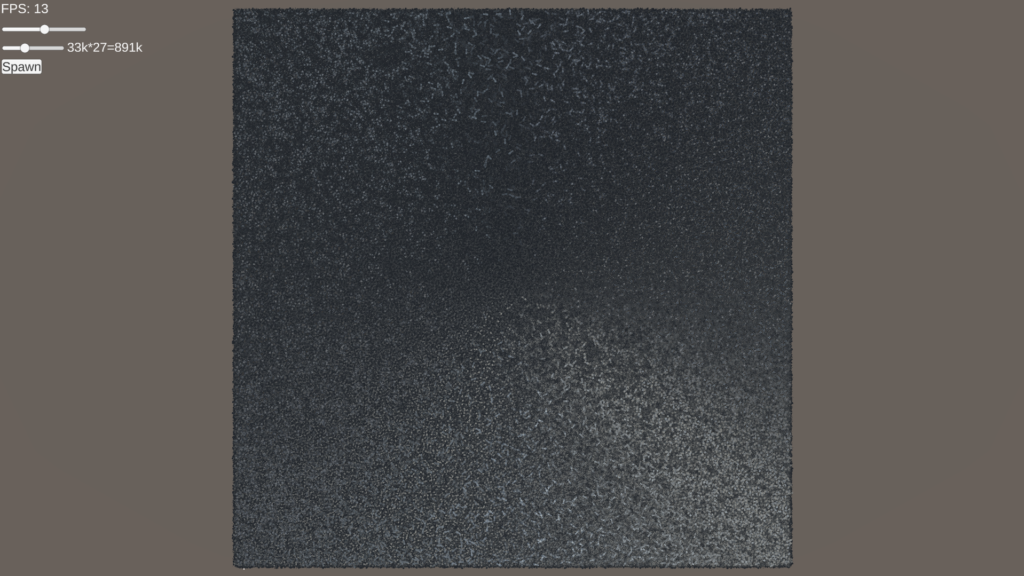
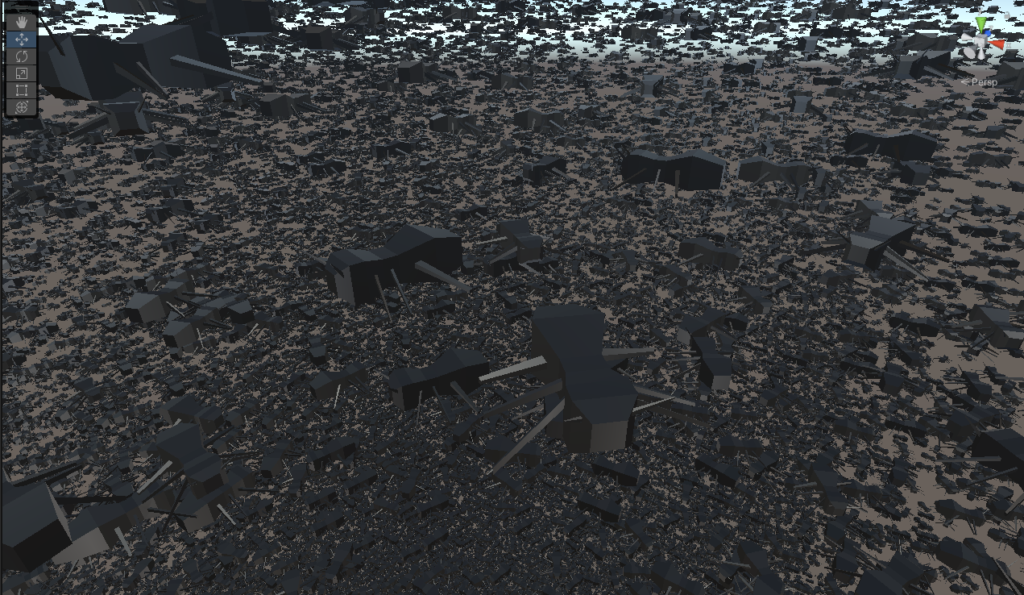
    As an experiment to play around with multi-mesh-instancing and compute shaders in Unity, I created a small project to render as many moving 3D low-poly ants as possible at the same time. Each ant was vertically offset by a few units and each was just pseudo randomly walking until hitting the virtual boundaries of the square. This was all done in a compute shader, and the result then rendered by the mesh-instancing unity provides.

    This way, it was possible to render ~900k ants moving around all visible at the same time with stable 13 FPS. (This was achieved with a AMD Ryzen 9 5900X and a NVIDIA Geforce RTX 2080 Ti) To force them to be rendered at all times, an orthographic camera from above was used, which always sees all the ants.

    Here is the link to the GitHub repository.

    Here is a short video clip of them in motion, but of course with that many small moving objects, the bitrate suffers very much.

    Mixed reality online multiplayer board game simulator in Unity 3D

    Together with a teammate, I created a multiplayer MR experience in which you can play Chess and Go. This was for the module “Windows App development” Used for this project was Unity3D, MRTK and PUN2. Check out the description and code on the GitHub repository.

    The project was made to work on an Augmented Reality device such as the Microsoft HoloLens and Virtual Reality Headsets such as the HP Reverb. The idea was that two players could connect with either platform and play with each other. Initially there were plans to integrate the table recognition of the MRTK for the AR devices, but that was scrapped due to time constraints.

    In the end, project had the following features:

    • peer to peer Online Multiplayer
    • AR and VR support
    • Builtin Chess and Go modes (no rules, just board and figures)
    • import of custom games with board texture, 3d models, snap positions, etc.
    • control with hand gestures for AR (Hololens)

    Note analyser

    As a university project for the module “Multimedia”, I was in a team to develop hardware which would recognize single notes or cords being played on an instrument (tuned to piano sounds).

    The project was run on a Raspberry Pi, and used the Fast Fourier Transformation to get the information needed. For a full writeup you best checkout the GitHub repository and the Printables entry.

    Dodge-Box – a learning/university project

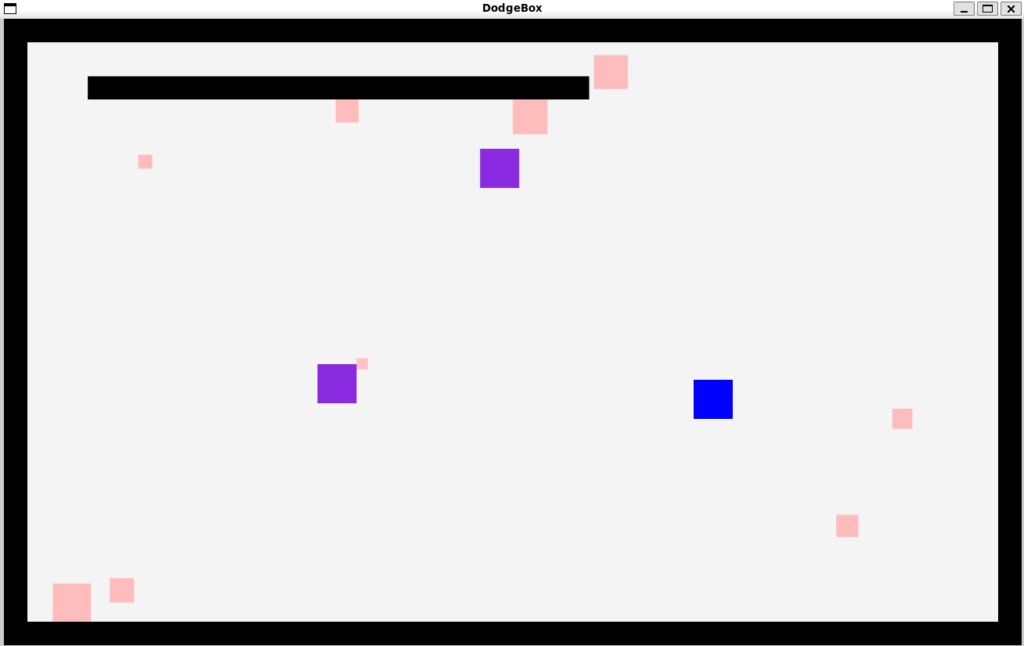
    Dodge-box is a university project for the module “Software Engineering” in which we were supposed to do some sort of programm in a group with version control. We, as a group of three, decided to do my go-to learning project “Dodgesquare” in javafx.

    We didn’t have all too much time, so the project ended up pretty crude, but it works and we got a good grade.

    GitHub repo: https://github.com/MisterIXI/dodge-box

    Automated Backup via Robocopy in Powershell

    Finally I got around to actually set up a Backup routine for my Hard drive to my little Raspberry Pi “NAS”.
    I decided against any fancy Software and went straight to robocopy to mirror all my files. This has the added benefit of being able to browse the files normally, but it lacks any form of compression or security by itself. For me that is enough for now though, so I went with it.

    The script is fairly simple. It basically first copies a few selected User related files from my C: drive to the appropiate folder on my HDD and then Mirrors the whole tree from D:\ downwards over to my Samba share on my RasPi.
    I needed to include some exceptions though.

    I replaced some personal Information in my script for security reasons, but here’s the whole script:
    Write-Output "Starting Backup at $(get-date -f yyyy-MM-dd--hh:mm:ss)..." >> \\192.168.[...]\[Sharename]\Backups\Logs\$(get-date -f yyyyMMdd)WindowsBackupScript.log
    Write-Output "Exporting Programlist" >> \\192.168.[...]\[Sharename]\Backups\Logs\$(get-date -f yyyyMMdd)WindowsBackupScript.log
    $tempCSV = Get-ItemProperty HKLM:\Software\Microsoft\Windows\CurrentVersion\Uninstall\* | Select-Object DisplayName, DisplayVersion, Publisher, UninstallString | where DisplayName -NotLike *Microsoft*
    $tempCSV += Get-ItemProperty HKLM:\Software\WOW6432Node\Microsoft\Windows\CurrentVersion\Uninstall\* | Select-Object DisplayName, DisplayVersion, Publisher, UninstallString | where DisplayName -NotLike *Microsoft*
    $tempCSV | Export-Csv D:\UserBackups\ProgramExport.csv
    Write-Output "Copying User Stuff to Mainspace..." >> \\192.168.[...]\[Sharename]\Backups\Logs\$(get-date -f yyyyMMdd)WindowsBackupScript.log
    robocopy 'C:\Users\[Username]\AppData\Roaming\Microsoft\Windows\Start Menu\Programs\customLinks' D:\UserBackups /MIR /Tee /Z
    Write-Output "Backing up Mainspace..." >> \\192.168.[...]\[Sharename]\Backups\Logs\$(get-date -f yyyyMMdd)WindowsBackupScript.log
    cd D:\
    robocopy D: \\192.168.[...]\[Sharename]\Backups\[PC-Name]\Mainspace /MIR /LOG+:"\\192.168.[...]\[Sharename]\Backups\Logs\$(get-date -f yyyyMMdd)robocopyD_log.log" /Z /XD D:\Steam "D:\other games" D:\HyperV D:\`$RECYCLE.BIN D:\Recovery "D:\System Volume Information" D:\config.msi -np -ndl -tee
    Write-Output "Finished Backup Job at $(get-date -f yyyy-MM-dd--hh:mm:ss)" >> \\192.168.[...]\[Sharename]\Backups\Logs\$(get-date -f yyyyMMdd)WindowsBackupScript.log
    Read-Host -Prompt "Finished all Backups. Press Enter to open the Logfile(s)."
    & 'C:\Program Files\Notepad++\notepad++.exe' "\\192.168.[...]\[Sharename]\Backups\Logs\$(get-date -f yyyyMMdd)robocopyD_log.log"

    So, what does my script do?
    I wanted to have a log of when the script does what, so I included “comment” lines which output what the script does to the log file.

    In a case of me having to reinstall Windows from scratch I decided to have some sort of list of installed programs. Backing up the installers or executables felt like a weak way to do this though, so I let powershell grab the installed programs from the registry directly and let it compile into a csv file.
    $tempCSV = Get-ItemProperty HKLM:\Software\Microsoft\Windows\CurrentVersion\Uninstall\* | Select-Object DisplayName, DisplayVersion, Publisher, UninstallString | where DisplayName -NotLike *Microsoft*
    I decided that I’d filter out everything with “Microsoft” in the name so I wouldn’t have all the restributables and stuff cluttering the list. This way a few actual programs get filtered out, but most of them are obvious enough for me to not be important in that list.
    Anyway, this should help me remember the various programs I installed, just in case.

    robocopy 'C:\Users\[Username]\AppData\Roaming\Microsoft\Windows\Start Menu\Programs\customLinks' D:\UserBackups /MIR /Tee /Z
    This little line copies the custom links I created so I can just type in the script names to run them.